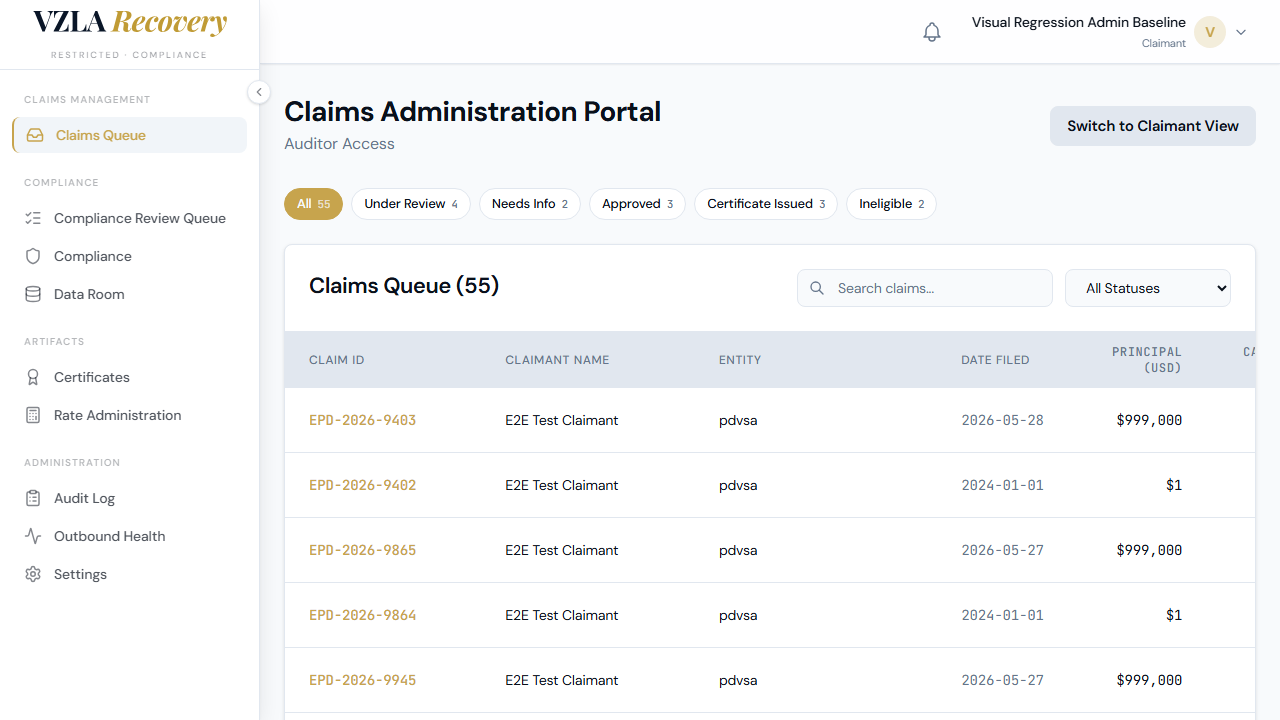
The claims queue
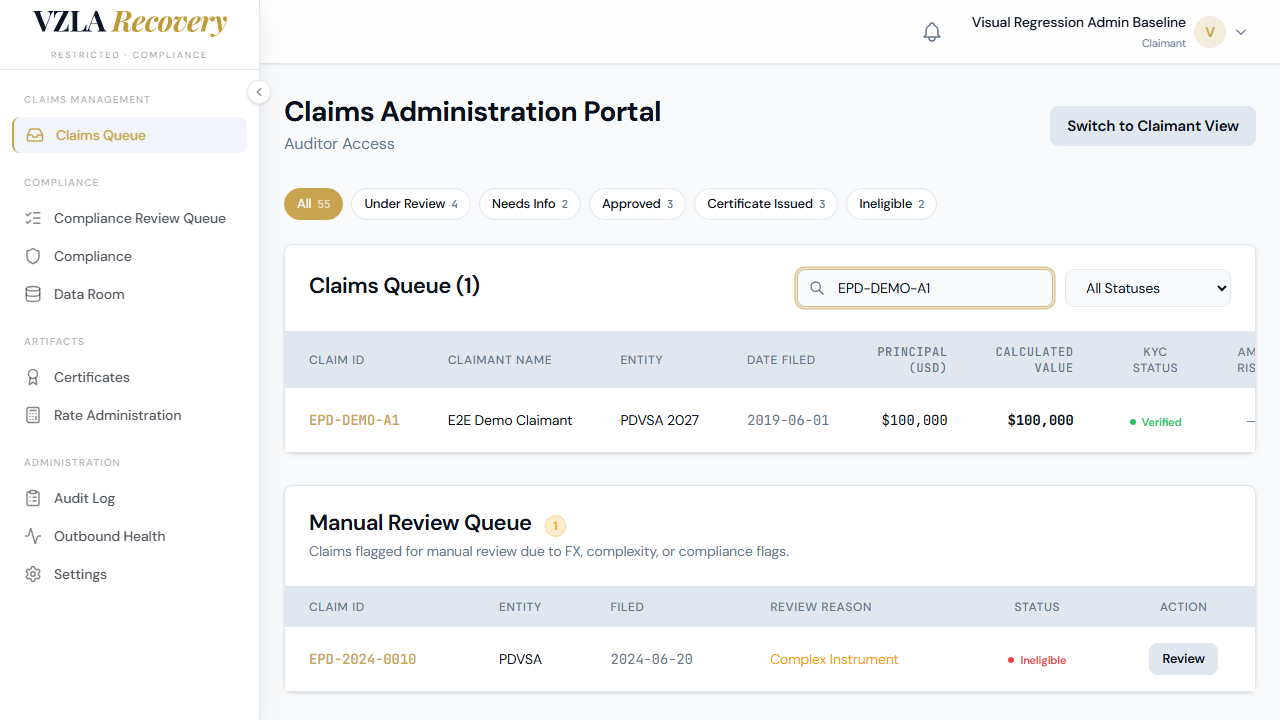
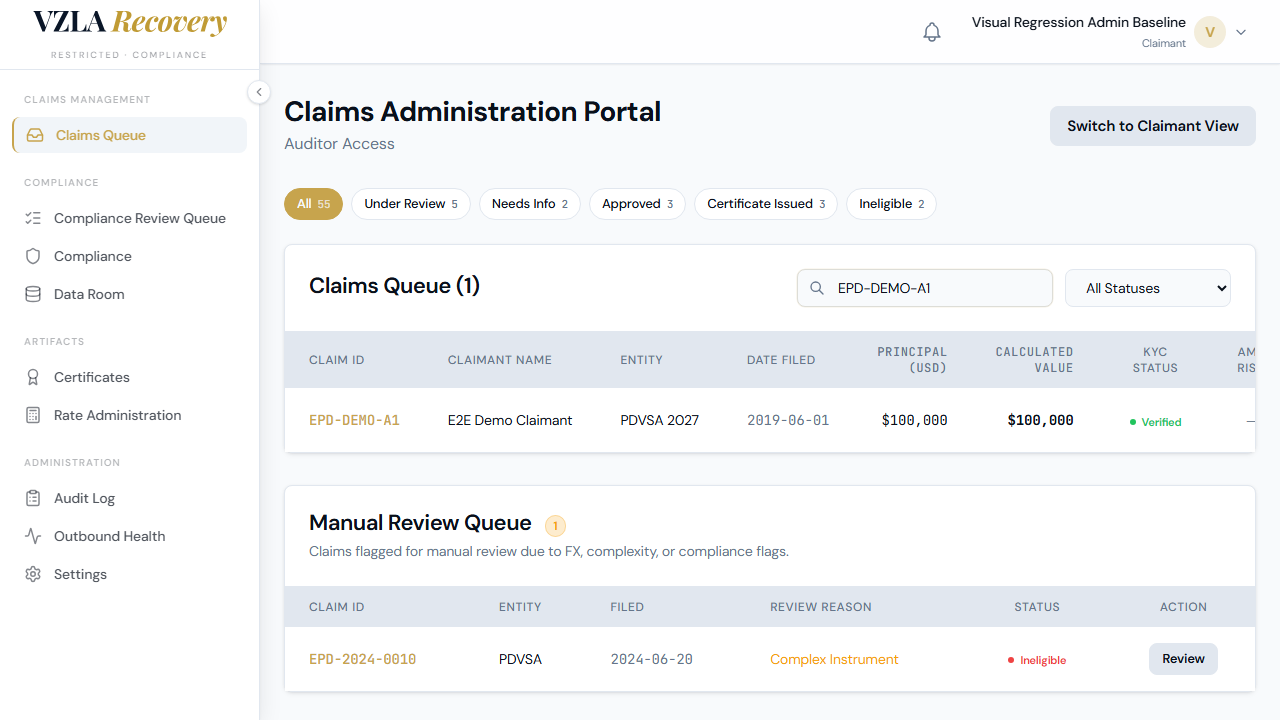
The claims queue is your main workspace for reviewing all claimants' submitted claims in one place. You'll see a table with key details about each claim, filters to narrow the list, and buttons to review individual claims in detail.
- Log in to the portal as a Compliance User. You'll land on the admin home page automatically.
- At the top of the page, you'll see the claims queue — a table showing all submitted claims from all claimants. Each row is a claim.
- The table has 11 columns: Claim ID, Claimant Name, Entity, Date Filed, Principal, Calculated Value, KYC Status, AML Risk, SAP Reference, Status, and Action.
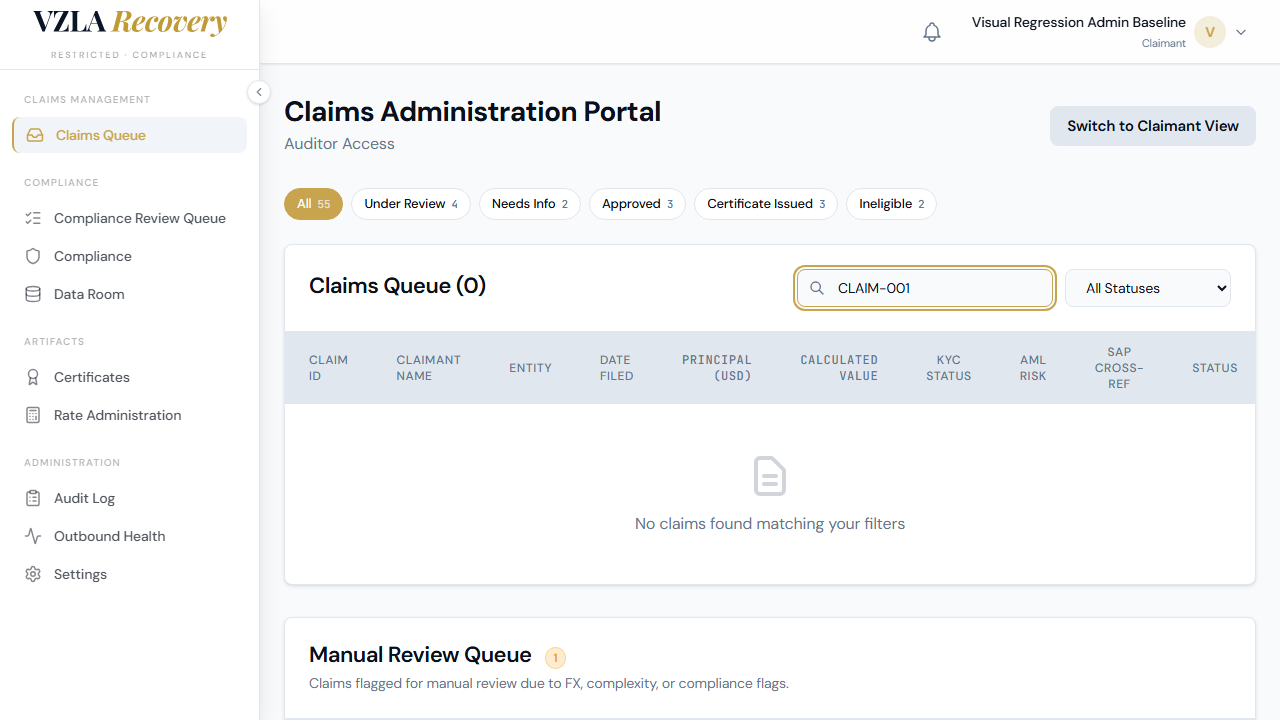
- To find a specific claim quickly, use the search box in the upper right. Type part of a claim ID, entity name, or claimant name and the table will filter in real time.
- To filter by claim status (e.g., Under Review, Approved, Ineligible), use the dropdown next to the search box or click one of the colored status pills above the table.
- Click any row in the table to open a side panel with the full claim details. From there you can review documents, approve, reject, or request more information from the claimant.
- The AML Risk column shows a colored badge for each claim: green for low risk, amber for medium, red outline for high, and solid red for critical. The badge shows the numeric score when you hover over it.
- Below the main queue, you'll find the Manual Review Queue — a separate section that surfaces claims flagged for human attention (FX exposure, arbitration awards, multi-tranche structures, or nationalization types). These require manual sign-off before approval.
- If the claim list is very long, use the Prev/Next buttons at the bottom of the table to browse through pages of 50 claims at a time.
- To return to the claimant view and impersonate a claimant's experience, click the 'Switch to claimant view' button at the top right. You'll be logged into the claimant dashboard.

Frequently asked
How do I see claims from all claimants, not just one?
The claims queue always shows all claims from all claimants at once. You don't need to do anything special — every row in the table is visible unless you apply a filter.
What does the AML Risk column mean?
AML stands for Anti-Money Laundering. The colored badge shows how risky a claim is from a compliance perspective. Green is safe, amber means you should review carefully, and red means high or critical risk. Hover over any badge to see the numeric risk score.
What's the difference between the main queue and the Manual Review Queue?
The main queue shows all claims. The Manual Review Queue (below) automatically surfaces only the claims that need extra human attention — for example, claims with foreign exchange exposure, arbitration awards, or complex multi-part payments. These must be manually approved before moving forward.
Can I sort the table by claim ID or amount?
The column headers show sorting icons but sorting is not yet available. Use the search and filter controls to narrow the list instead.
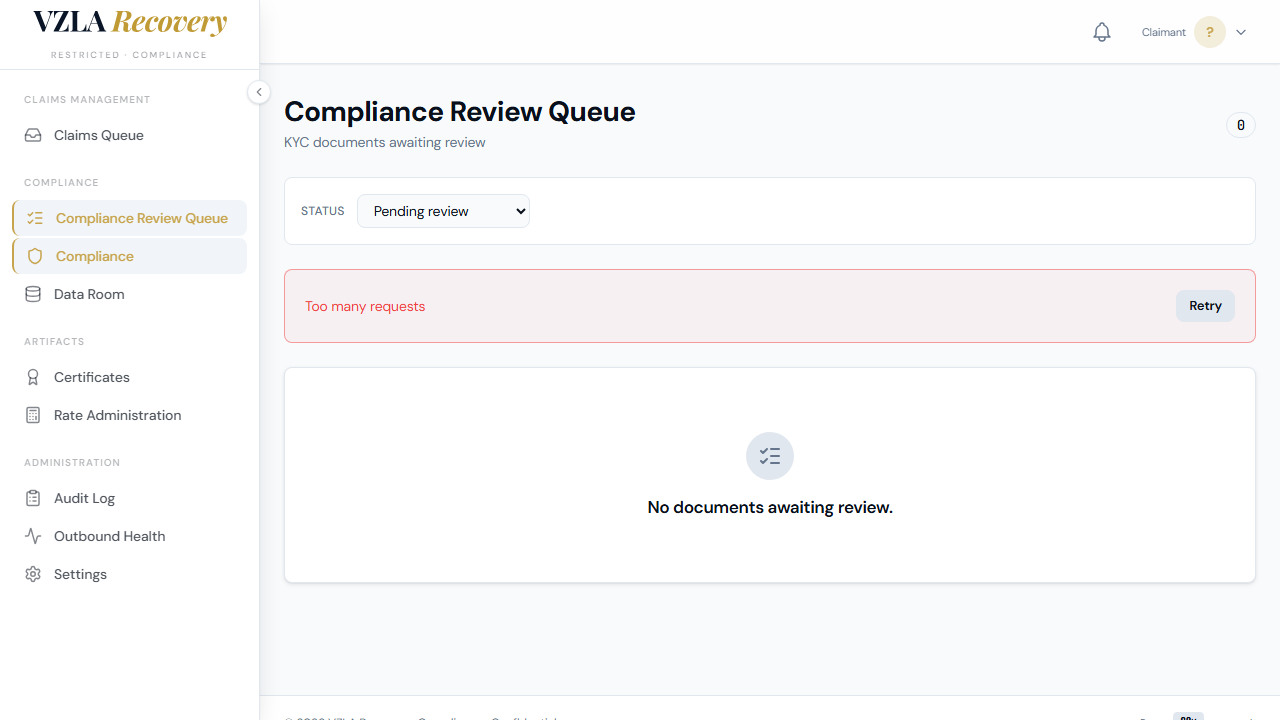
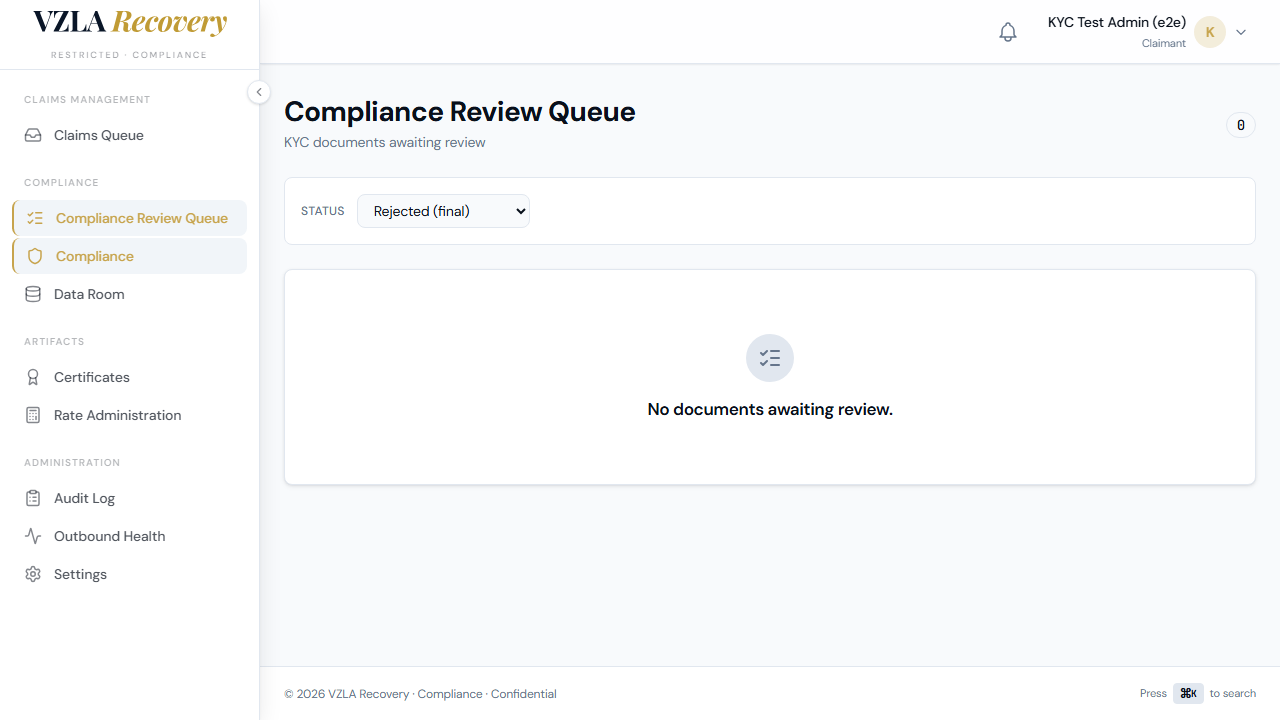
Reviewing identity checks (KYC queue)
The KYC queue is where you review claimants' identity documents before their claims move forward. This section shows you how to access the queue, view pending documents, and make review decisions.
- Open the Venezuela portal and log in as a compliance reviewer.
- Go to the Admin section and find Compliance in the menu.
- Click KYC Queue. You'll see a list of claimants who have submitted identity documents.
- By default, the queue shows documents awaiting review (Pending Review status). Use the status filter dropdown to see approved, rejected, or all documents if needed.
- Search or scroll to find the claimant you want to review. The table shows each claimant's name and email, the claim ID (first 8 characters), the document type, when it was uploaded, and its current status.
- Click any row to open that claimant's document for detailed review.
- On the detail page, you'll see the claimant's information at the top and the document preview (PDF or image) on the left side.
- On the right, you'll find the review form with a notes field and three decision buttons: Accept, Reject (resubmit), and Reject Final.
- If you're approving the document, click Accept. A confirmation dialog will appear—click Confirm to finalize.
- If you're rejecting, type a brief explanation in the notes field (required for rejection), then click either Reject (resubmit) for fixable issues or Reject Final for unfixable ones. Confirm your choice.
- Once you submit a decision, the claimant receives an email notification of the outcome, and the document status updates immediately.
- After you make a decision, you'll be sent back to the queue list. If you set a filter before, that filter is remembered so you can continue reviewing from where you left off.
Frequently asked
What happens after I click Accept?
A confirmation dialog appears. After you confirm, the document status changes to Accepted, the claimant receives an approval email, and you're sent back to the queue list.
Can I reject a document without writing a note?
No. If you choose Reject Resubmit or Reject Final, you must type an explanation in the notes field (up to 1000 characters). This helps the claimant understand what needs to be fixed.
What's the difference between Reject Resubmit and Reject Final?
Use Reject Resubmit if the document has fixable issues (blurry image, missing information)—the claimant can upload a corrected version. Use Reject Final if the document cannot be approved under any circumstances (fraud, ineligibility)—no resubmission is allowed.
If I review a document and leave the page, do I lose my changes?
Once you submit a decision (Accept or Reject), it is saved immediately and the document is locked. You cannot review it again. If you're still working on your notes and haven't submitted, leaving the page will discard your unsaved text.
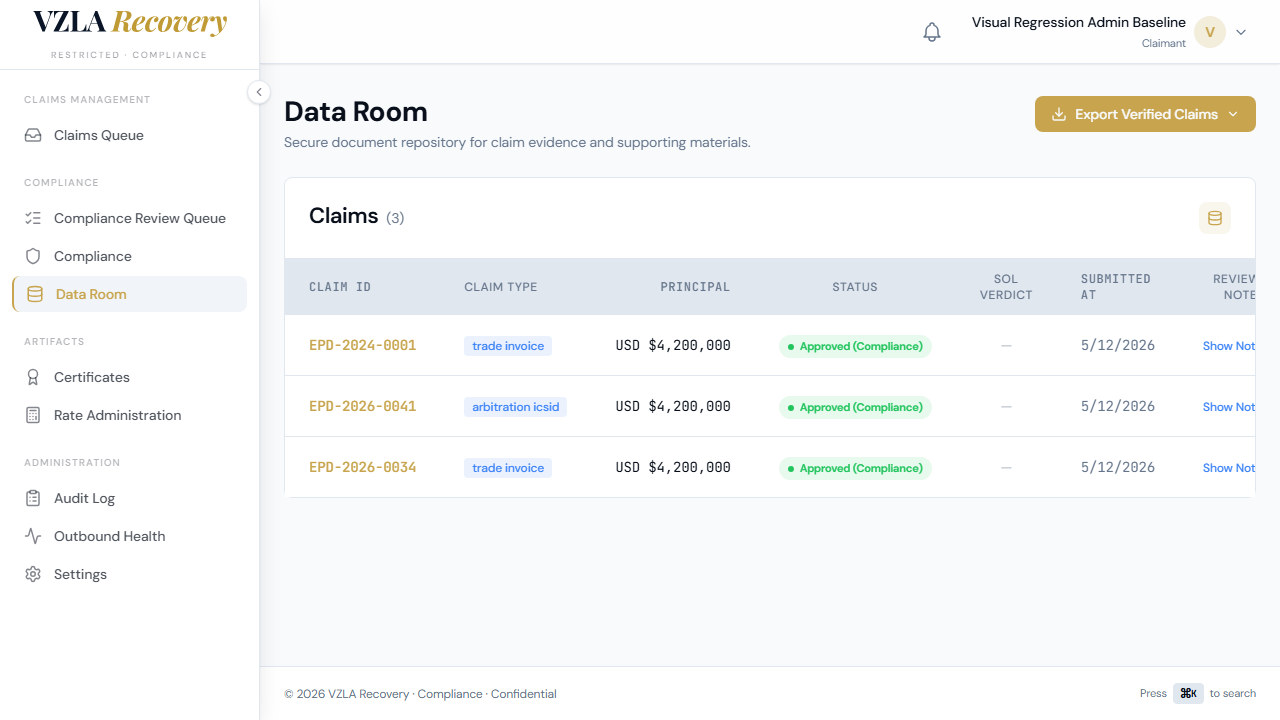
The data room (reviewing a claim file)
The data room is your main workspace for reviewing claim submissions. You'll find a secure table with all submitted claims, organized columns to compare details, and tools to add your notes and export data.
- Log in to the portal using your admin account. You'll see the main dashboard with a sidebar menu on the left.
- Click "Data Room" in the sidebar under the Compliance section. The page loads showing all submitted claims in a table.
- Look at the table columns: each row shows the Claim ID (in gold, left side), Claim Type (like 'trade invoice'), Principal amount (right-aligned in monospace), Status badge (green for Approved), SoL Verdict (show whether time is still available), and the Submitted date.
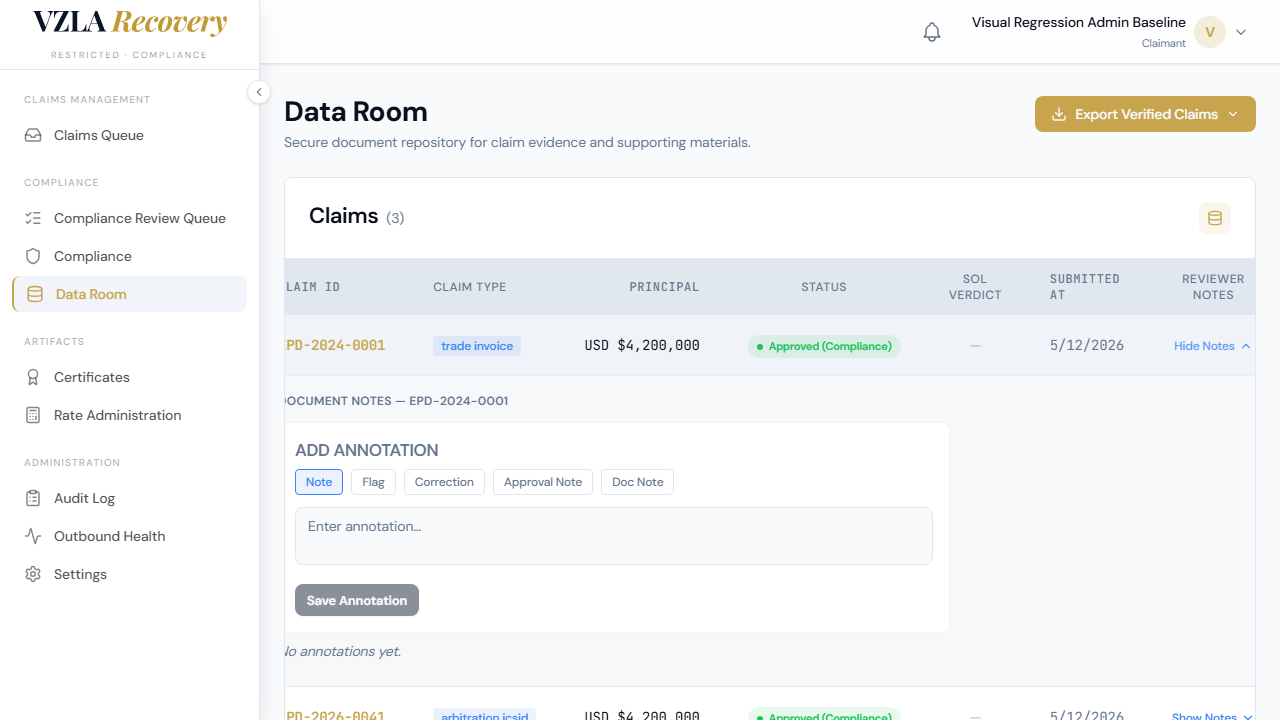
- To add your notes to a claim, click the "Show Notes" button in the rightmost column. A notes panel expands below the row where you can enter your review comments.
- In the notes panel, choose a note category from the tabs: Note, Flag, Correction, Approval Note, or Doc Note. Type your observation in the text box and click "Save Annotation". Your note is saved immediately.
- To hide the notes panel, click "Hide Notes" on that row.
- To view the full claim submission details (all 8 sections of the EPOD form), click the blue button in the View Detail column. You'll see each section in a collapsible card — click any section title to expand and read the complete data.
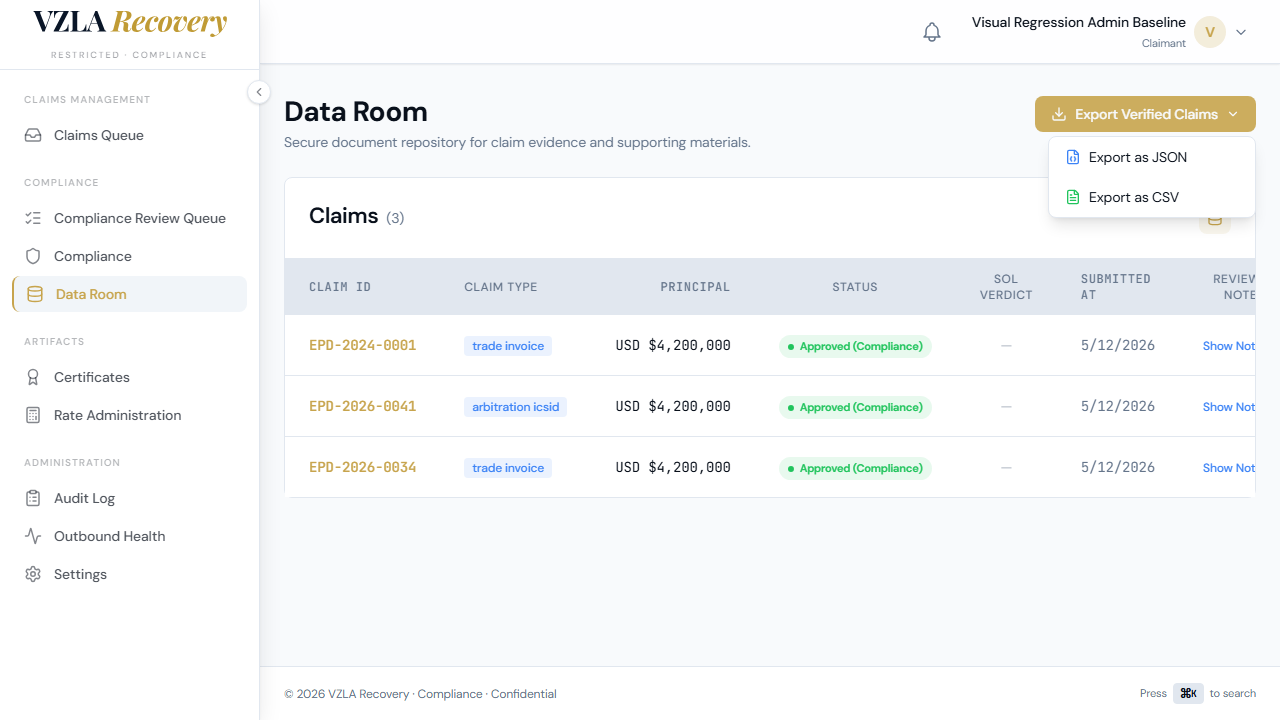
- To download a copy of all approved claims for your audit tools, click the gold "Export Verified Claims" button at the top right. Choose "Export as JSON" for data files or "Export as CSV" for spreadsheet programs.
- The table shows a count in parentheses next to 'Claims' (e.g., 'Claims (3)') so you always know how many you're reviewing.
Frequently asked
What happens to my notes after I save them?
Your notes are saved instantly to that claim's record. They stay there permanently and are visible only to you and other compliance reviewers—not to the claimant. If you need to add more notes later, just click 'Show Notes' again.
Can I edit a claim's original information (like the principal amount or entity name) from the data room?
No. The data room is read-only for original claim data to protect the chain of custody. Claimant submissions cannot be edited. You can only add your own reviewer notes and annotations.
What's the difference between exporting as JSON and CSV?
JSON is a data format that works well in code and data pipelines. CSV is a spreadsheet format that opens in Excel or Google Sheets. Both contain the same claim records—choose whichever format your audit tools need.
If I close my browser, will I lose the notes I was typing?
Yes, if you close before clicking 'Save Annotation', your typed notes will be lost. Always click Save before navigating away from the notes panel.
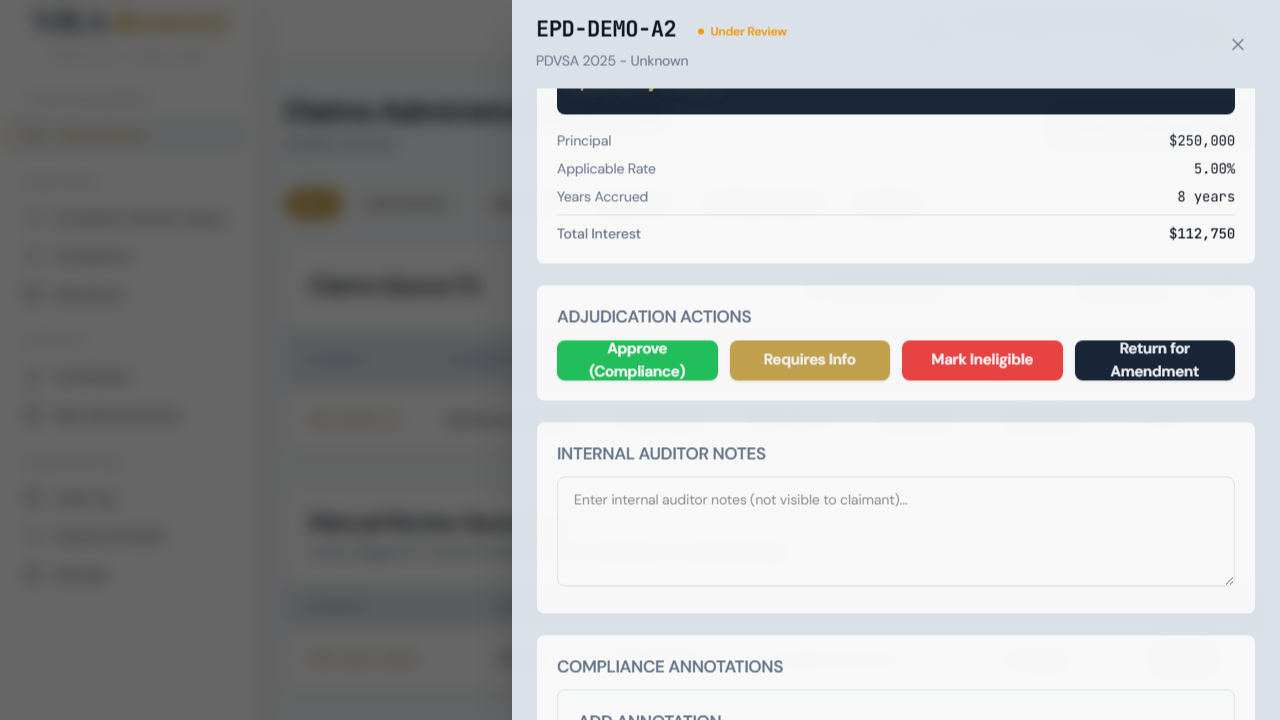
Adjudicating a Claim (Begin Review → Decision)
This guide walks you through reviewing and making a final decision on a submitted debt claim. You'll open the claim details, start the review process, and then approve, mark ineligible, or request more information from the claimant.
- Go to the Claims Administration Portal and filter to see Submitted claims. Find the claim you want to review and click on it to open the full details panel on the right side of your screen.
- In the Adjudication Actions section at the bottom of the claim panel, click the Begin Review button to move the claim into active compliance review.
- Once the claim is under review, the action buttons will update. Choose one of these next steps: Approve (Compliance) to formally approve the claim and trigger certificate issuance, Mark Ineligible if the claim does not meet eligibility requirements, or Requires Info if you need more documentation from the claimant.
- A dialog box will open asking you to confirm your decision. For Approve, review the claim details one more time. For Mark Ineligible or Requires Info, select a reason from the dropdown menu (examples: Insufficient documentation, Time-barred claim, Discrepancy in amounts).
- In the Comment field, add any notes to explain your decision. For example: 'Missing invoice copy' or 'Approved—all documents verified.' This text will be recorded in the audit trail.
- Click the confirmation button (Approve, Mark Ineligible, or Request Info) to finalize your decision. A notification will appear confirming the claim status has been updated.
- You will be returned to the claim details panel, where the claim status badge at the top will now show Approved, Ineligible, or Requires Info. All your notes and the action timestamp are logged in the Audit Trail section below.
Frequently asked
Can I change my decision after I approve or mark a claim ineligible?
No. Once you submit a decision, it is final and recorded in the audit trail. If you need to reverse a decision, contact your supervisor.
What should I write in the Comment field?
Be specific and clear. Explain what documents you reviewed, any issues you found, or why the claim qualifies. This comment becomes part of the permanent audit record.
If I mark a claim Requires Info, what happens next?
The claimant will be notified by email that more information is needed. They can log into the portal, view your request, and submit additional documents. The claim will return to your queue once they respond.
Where can I see all the actions I've taken on a claim?
Scroll to the bottom of the claim detail panel and look at the Audit Trail section. It shows every action, the date and time it was taken, and any notes you added.
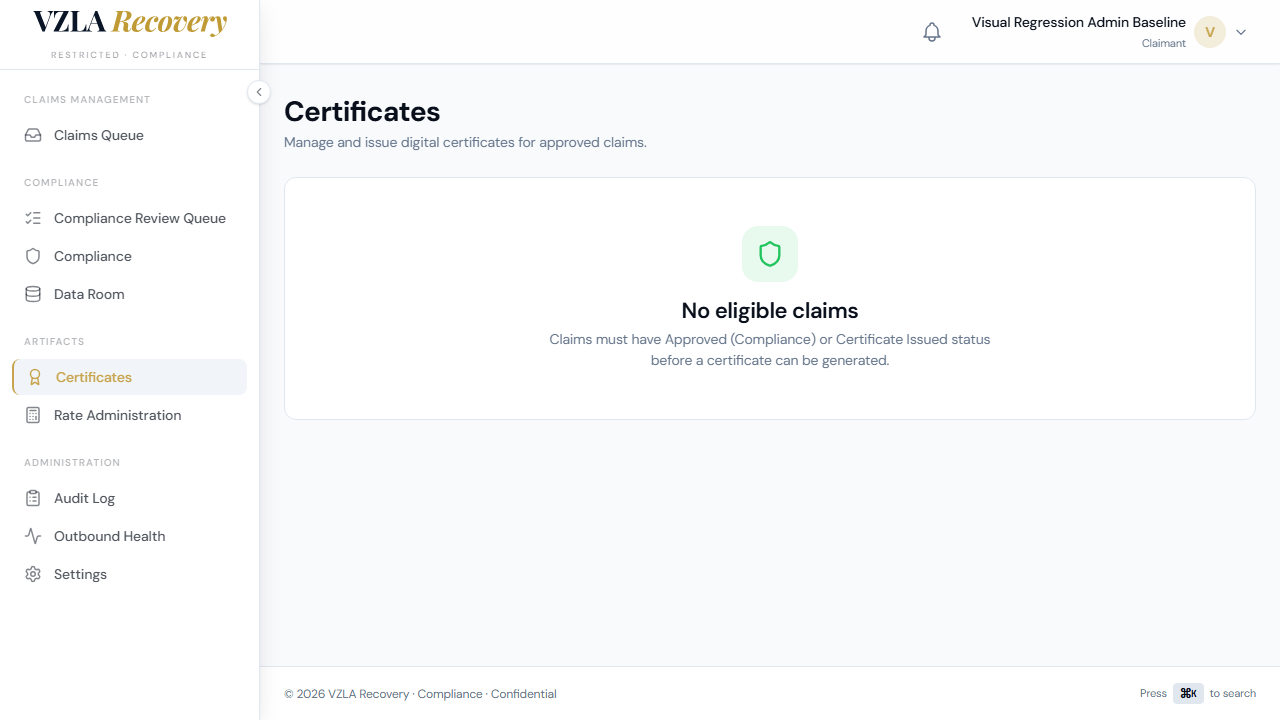
Certificates & the audit log
This section shows you how to generate digital certificates for approved claims and how to review the audit log that records all actions on the platform for compliance tracking.
- Go to the Certificates page from the admin menu. You will see a list of all approved claims that are ready for certification.
- For each claim, review the claim ID, business name, and invoice reference to ensure you are certifying the correct claim.
- Click the Generate Certificate button. The system will create a unique certificate ID and verification code for that claim.
- Once generated, the certificate card will appear showing the certificate ID, QR code, and verification hash. This information can be shared with the claimant or the counterparty.
- Click the Verify button to copy the verification code to your clipboard, then share it securely with the stakeholder who needs to verify the certificate later.
- If you need to print or save the certificate, click the Download button to open the print dialog.
- To collapse a generated certificate and return to the generate view, click the Collapse button above the certificate card.
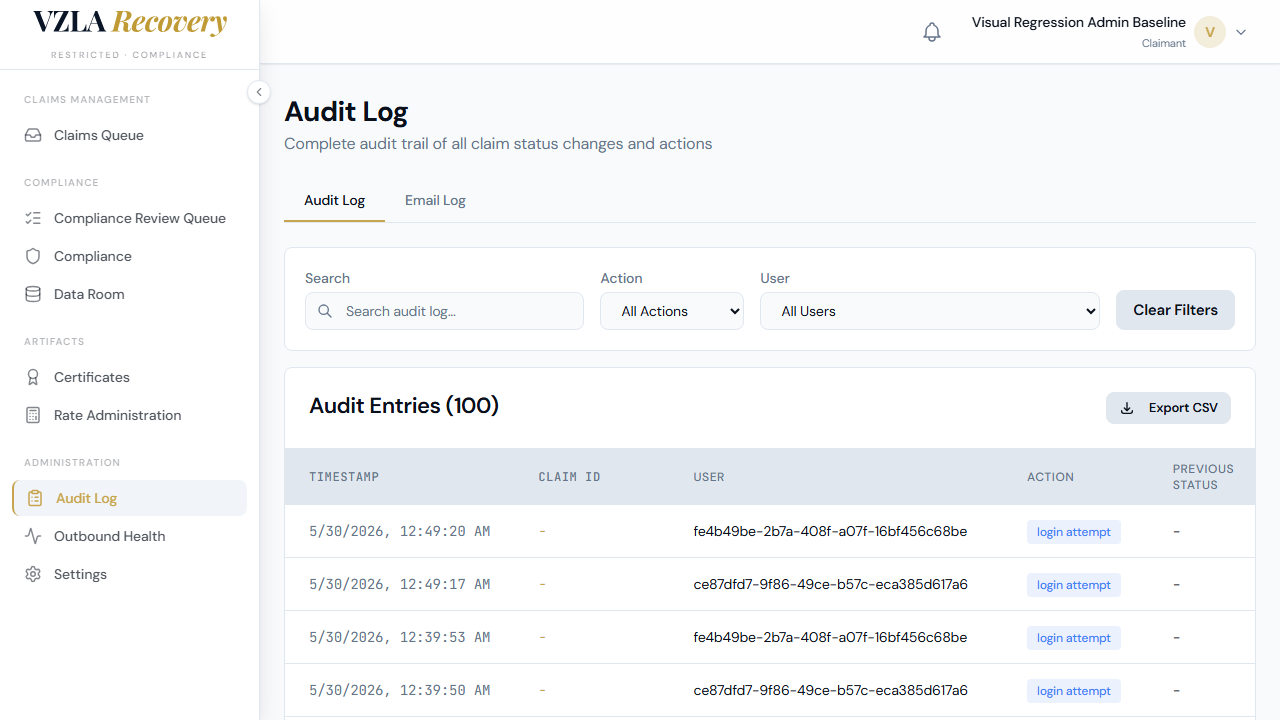
- Visit the Audit page (from the admin menu) to view a complete log of all certificates issued, status changes, logins, and other compliance events.
- Use the search box at the top of the audit table to find entries by claim ID, action type, username, or notes.
- Use the Action dropdown to filter the log by specific event types (for example, view only certificate_issued events).
- Use the User dropdown to filter the log to show only events performed by a specific team member.
- Combine multiple filters to isolate exactly what you are looking for—for example, all certificate events from a particular user in a time window.
- Click Clear Filters to reset all search and filter controls and see the full audit log again.
- The count at the top of the audit table ("Audit Entries (N)") updates automatically as you filter, so you always know how many events match your criteria.
Frequently asked
What does the Verify button do?
The Verify button copies the certificate's verification hash—a unique code that proves the certificate is authentic—to your clipboard. You can then paste and send it to someone who needs to confirm the certificate is genuine.
Can I edit or delete entries in the audit log?
No. The audit log is read-only for compliance and security reasons. Every action is recorded automatically and cannot be changed or removed. This creates a permanent record of who did what and when.
Why do I see claims with 'Certificate Issued' status on the Certificates page?
These are claims that already have a certificate on file. You can generate a replacement certificate if needed—the system will create a new certificate ID while the old one remains in the audit log.
How long is the audit log kept?
The audit log is retained for 6 years per regulatory requirements. All events—logins, status changes, certificate issuance, and team annotations—remain permanently in the system so the Compliance User and leadership can review the history of any claim at any time.
Admin Operations
Compliance reviewers use the Admin dashboard to manage interest rates, upload multiple claims at once, monitor claims analytics, and preview email templates sent to claimants.
- Click Admin in the top navigation to access admin tools.
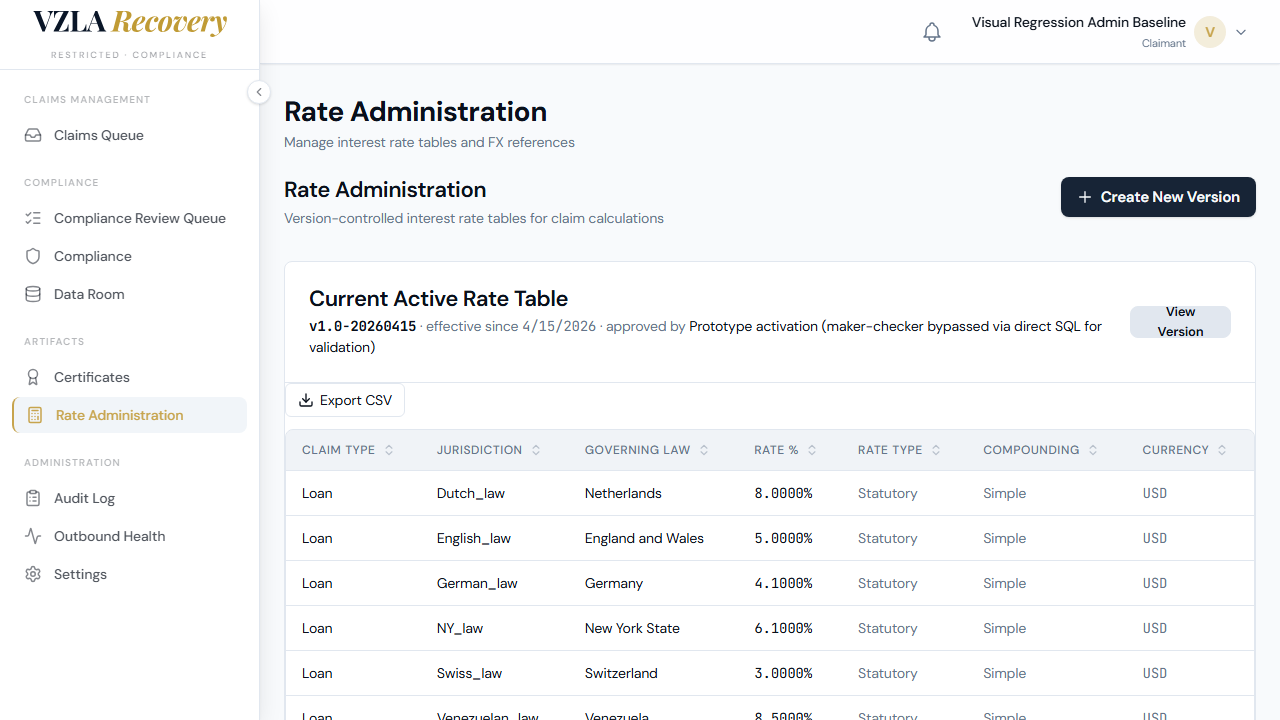
- Select Rates to manage interest rate versions. Click Create New Version to add a new rate table, or click on any version in the All Versions table to review or approve it. Use the Status filter to view draft, pending, or active versions.
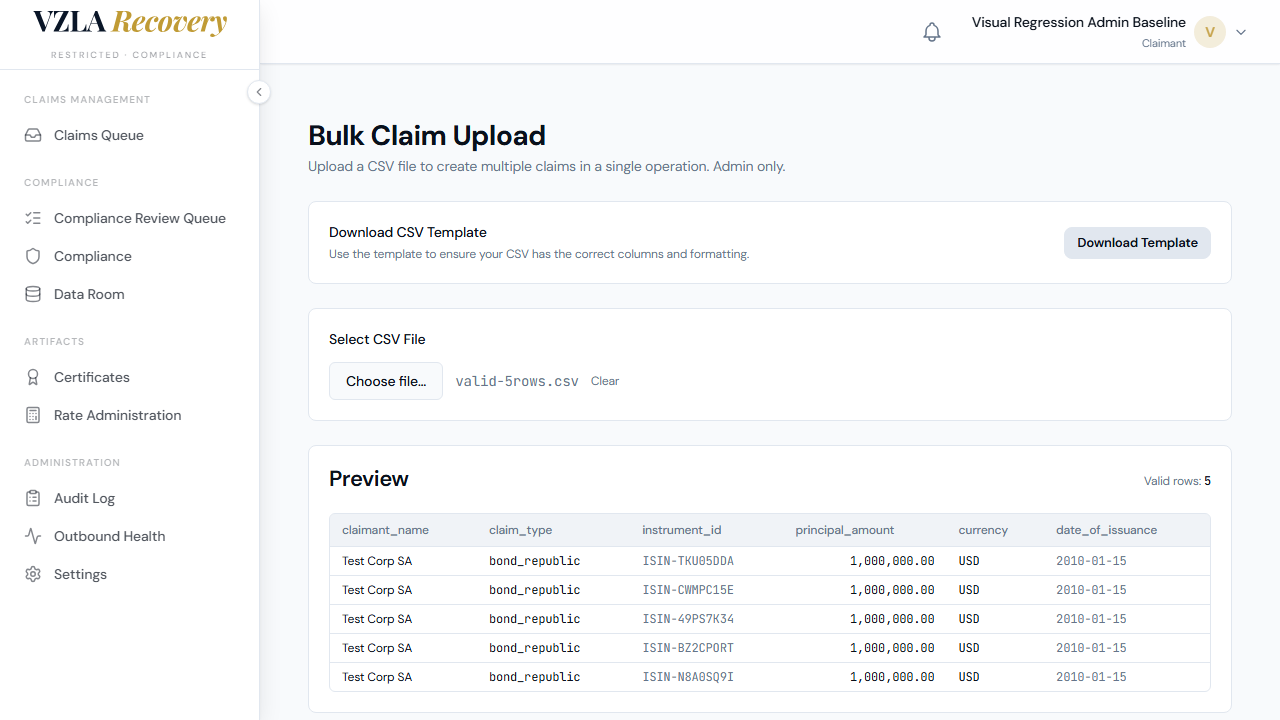
- Select Bulk Upload to import multiple claims from a CSV file. Click Download Template to get the required CSV format, fill in your claims data, then select your file to preview the rows. Click Submit to create all valid claims at once.
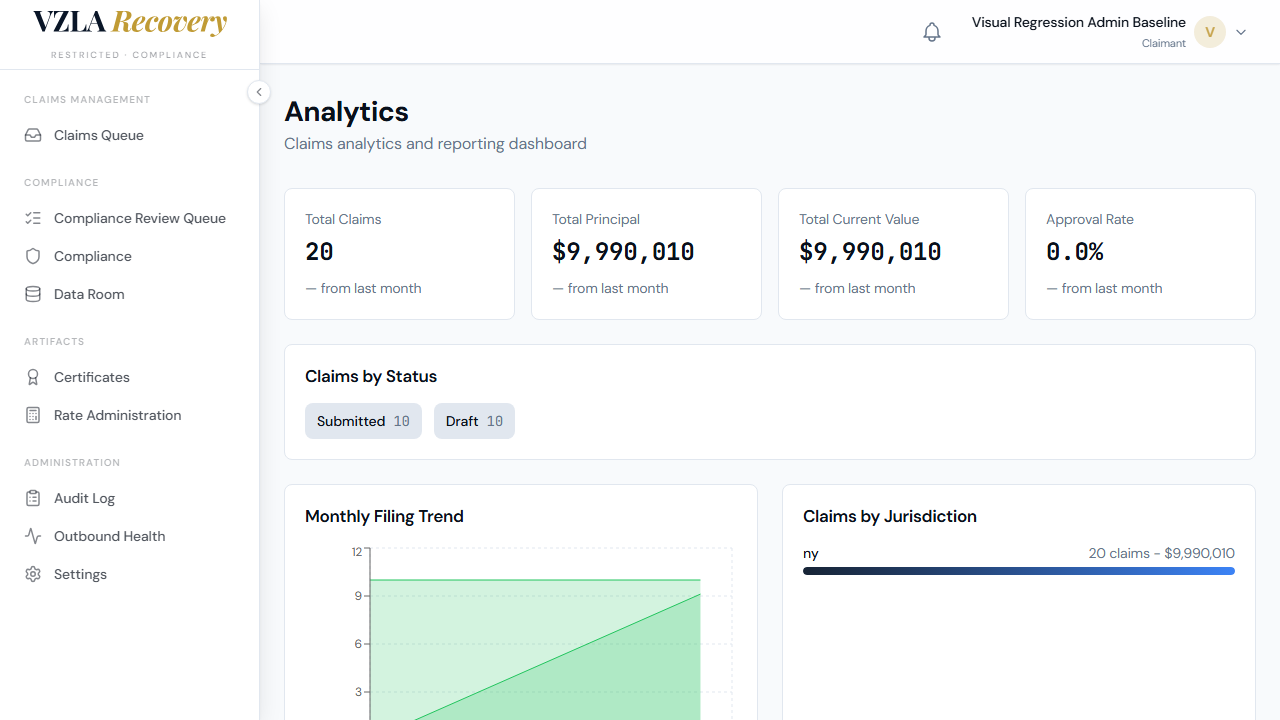
- Select Analytics to view portfolio-level summaries. Four cards at the top show Total Claims, Total Principal, Total Current Value, and Approval Rate. Scroll down to see charts showing claims by status, by entity, monthly filing trends, and jurisdictions.
- Select Email to preview the five transactional email templates (Status Change, Submission Confirmation, Draft Expiry, Requires Info, Claim Approved). Click Preview on any template to expand and see the HTML rendering and plain-text versions.
- Select Settings to configure portal toggles (Registration, Maintenance Mode, Auto-Approve, Email Notifications) and export data as CSV, Excel, or an audit log.
Frequently asked
Can I create a new interest rate version if a draft already exists?
No. The Create New Version button is disabled with a tooltip explaining that you must edit or submit the existing draft first. This prevents accidentally overwriting uncommitted work.
What happens if my CSV has some invalid rows when I upload?
The system creates all valid rows and shows you a list of the rows that failed, along with the reason why (for example, missing claimant name or non-numeric principal amount). You can then fix those rows and re-upload them.
Why can't I approve a rate version I created myself?
This is a compliance control called maker-checker. The person who creates a rate change cannot approve it. A different admin must review and approve your version to ensure two people sign off on sensitive changes.
Are the email templates live or just for preview?
These are templates you can preview to check the content and formatting. They show what claimants will receive. Currently, emails are logged to the console only — AWS SES delivery is not yet configured, as noted in the warning banner.